|

Pedestrian
poles: Poles
Pedestrian poles are available in aluminum or steel and come in any
lengths up to 20 feet.
Aluminum poles have a rough texture finish consisting of a uniform grain
pattern.
Steel poles are either galvanized or painted. The galvanizing shall be a
minimum of 1.6 oz/ft. squared. Painted poles shall be sand blasted or
spun and the paint shall be applied to 3 mil total.
Specifications
Material: Aluminum or Steel –
Schedule 40 Or 80 ASTM A53
Grade B ERW
Threading: In accordance with American National Standard Pipe Threads
NPT (ANSI B2.1)
Recommendations for installing pedestal bases, poles, and support
collars.
Ø
Prior to
pouring a concrete foundation or installing a Helix foundation, ensure
the bolt circle (check project specifications for bolt circle and anchor
bolt diameters) of the anchor bolts or studs are set to match the bolt
circle pattern of the pedestal base.
Ø
Ensure the
foundation is flat and level. Do not use shims.
Ø
Use the
following installation hardware sized to fit either a 1” or ¼” anchor
bolt
-
Large heavy duty flat
washers (4 ea.)
-
Heavy duty nuts (4
ea.)
Ø
Place the
pedestal base over the anchor bolts. CAUTION: Do not hammer the
base in order to position the base over the anchor bolts. Notify the
Project Engineer if the bolt circles do not match.
Ø
Secure the
pedestal base to each anchor bolt using the hardware listed above.
IMPORTANT: The large heavy duty washer ensures proper load
distribution. Torque the heavy duty ground mounting nuts to 150 FT. LBS.
Ø
Thread the
4” diameter traffic pole to the base. Ensure the pole threads seat
properly into the base threads. Ensure there is a minimum of 10 pole
threads mated to the base threads.
Installations must me made
by licensed technicians.
Reinforcing collar for square bases
(only for Solar units)
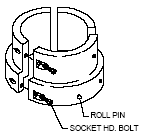
Reinforcing collar shall be a two or three segment assembly designed to
retro-fit onto an existing square cast aluminum or iron pedestal base.
The purpose for the
collar is to reinforce a pedestal shaft at the point where the threads
enter the base. The use of the collar will move the stress point to the
area immediately above the collar. This area maintains the strength of a
full wall thickness and provides greater movement ability.
Installations must me made
by licensed technicians.
Recommendations for installing pedestal bases,
poles and support collars
-
Place each part of
the support collar around the ensuring the inside lip of the support
collar rests on the top threaded collar of the pedestal base.
-
Connect the two or
three components of the support collar using the four stainless
steel hex head bolts shipped with the collar. Ensure the connecting
bolts are securely tightened using the correct size hex-head wrench.
-
Securely tighten the
bottom two setscrews on the bottom of the collar to the threaded
collar of the pedestal base. Ensure the collar does not rotate by
applying force to the collar.
-
At least one of the
sides of the collar must be screwed to the pole in order to
completely secure the pole. A bolt must be driven through at least
one of the halves of the collar into the pole. This will prevent the
collar from “walking” up the pole.
-
Finally, the collar
must be screwed to the base in the same fashion in which it was
secured to the pole. A bolt must be driven through at least one of
the halves of the collar into the base in order to prevent it from
detaching itself from the base.
Please refer to our web site for where we have posted pictures with the
latest information.
Installations must me made
by licensed technicians.
Oksolar.com is
not responsible for any typographical errors. Neither OkSolar.com nor
GeneralCommunications.com, corp. is not responsible or liable for errors
in installations. We offer industry-standard installations
recommendations guide lines; proper installation is the responsibility
of the installers.
If you have
any questions please don’t hesitate in contacting our technical support
staff if needed.
  
|
![]()